- use your data plan and a softphone. Disadvantages: Available only with expensive devices and plans and limited to internet connectivity and available bandwidth;
- use your data plan to activate the phone call. Disadvantages: Requires a data plan and a provider to support web activated telephony (although some tricks are possible using VoXaLot). You cannot obtain always the best rates.
- use a PSTN access number. Disadvantages: The provider must offer this service.
- use a hardware ATA device at home that offer a gateway between your PSTN line and a VoIP account. Disadvantages: Requires extra hardware.
- use a dedicated Linux box with Asterisk and DISA (Direct Inward System Access). Disadvantages: requires an extra machine and Linux which is still scary enough for the majority of users.
The solution described in this article has the following advantages:
- use any VoIP provider. Select the provider that has the best rates with your destination.
- use more that one VoIP provider. The provider will be dynamically selected at the moment your make the phone call. Besides hi-availability through redundancy, more providers allow you to call different destinations at best rates;
- requires no extra hardware. Nothing to buy.
- doesn’t require Linux.
- you don’t need a data plan. Just call a real US phone number (that you select) from your mobile phone or any other phone.
- Easy to implement. In only 20 minutes after reading this article you’ll have your system up and running.
Step 1. Required software
 For implementing this solution you need to download and install the following Windows applications.
NCH Axon. This is free software period.
NCH IVM. Although not free, you can use the trial version and if you like it you can buy it at a later time.
Step 2. Configure Axon
Axon configuration will be done using a web browser. Click on Web Control button in main Axon window to launch your default browser and log into Axon configuration site.
First you need to define an extension for the call attendant. Go to extensions tab and click on Add New Extension button. Ignore for now the other extensions that come with the system. You can clean them later when you’ll have a better understanding of this software.
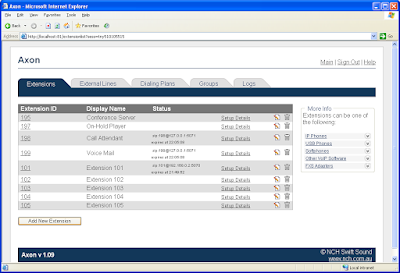
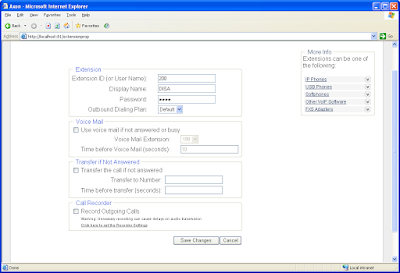
Just complete the minimum information for the new extension:
Extension ID: 200
Display Name: DISA (which stands for Direct Inward System Access)
Password: disa
Second you need to define external lines. For this switch to corresponding tab and eventually remove any existing data on this tab before adding any new line.
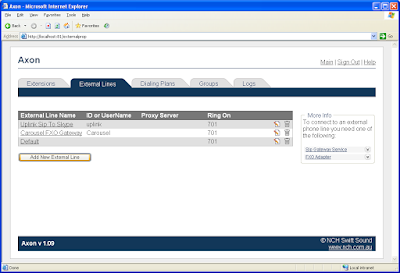
Since the system will be used to make cheap international calls from USA we need at least one VoIP provider that provide a real US phone number and one or more VoIP providers that offer good rates with the destination.
FreeDigits is the perfect candidate for the US provider due to their offer: Free Read US Phone Number and Free Unlimited Incoming Calls. As international providers we’ll select SmartCall and TelefonIP due to their good rates with Europe (especially Romania).
The following images show how to configure these providers in Axon.
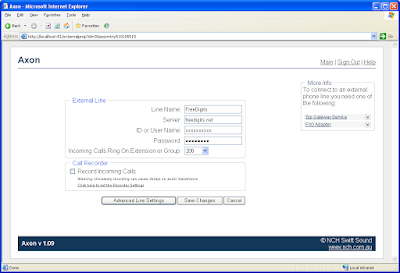
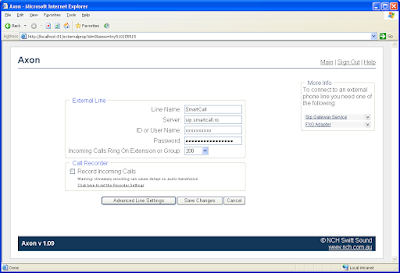
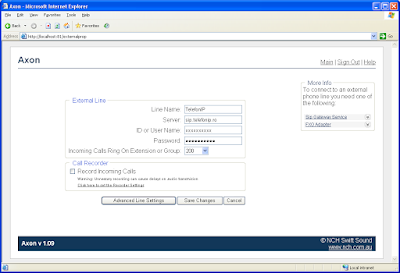
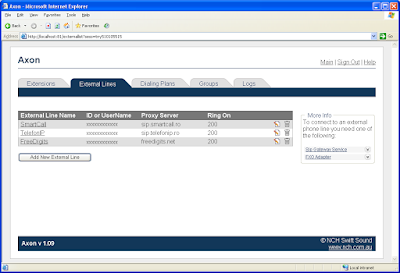
After you finish adding the providers, the External Lines tab should look like in the following image.
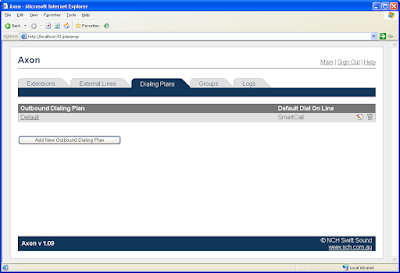
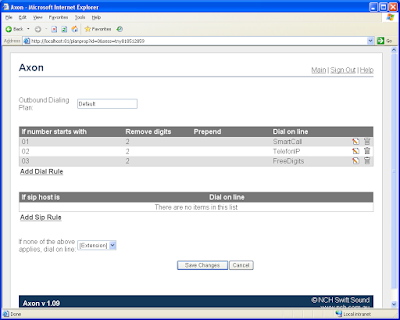
The last thing that we need to configure in Axon is the dial plan. This specifies what provider should handle a particular destination number. To keep things simple we’ll edit the default dial plan, adding the information as in the following images:
Step 3. Configure IVM
IVM is a SIP client that will answer automatically and present caller an interactive voice menu. IVM will be used to implement our call attendant.
From the main IVM window, click on Settings then go on Telephony tab, clear existing items there and then add a new VoIP provider settings. Since IVM will connect to our Axon server, and both are installed on the same machine, we’ll specify localhost in server field, 200 as SIP number and disa (or the password you set when you defined the 200 extension in Axon) as password.
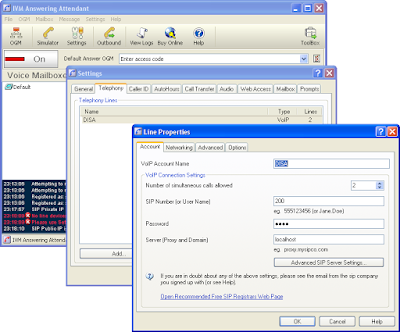
Next, press the OGM button on the main toolbar to open the OGM manager. Here create 2 new items: Enter access code and Enter destination number.

The complete instructions for creating these items are displayed in the following 2 images, the important areas being highlighted. Please note that you need to change the out going audio messages for both items by recording new voice prompts. Also put a secret 4 digits code in the corresponding textbox and a valid phone number in the CID textbox. The CID setting allows you to avoid entering access code if you initiate the call from the specified phone number.
![Define [Enter Access Code] prompt](https://blogger.googleusercontent.com/img/b/R29vZ2xl/AVvXsEh1xfAjrLg0LLrZ0DjkQB4FZrU_aSqhW4yyMb-X1eBw8XPEl0YvmZwaWZxkCl-EOFlTpurHUgnEeiBIxFajSsPz2enWIP4LTlXQyzM2eq5DWza4UEios56eA1FWLjN_HwpW-EMmmQ/s400/i131415.png)
![Define [Enter Destination Number] prompt](https://blogger.googleusercontent.com/img/b/R29vZ2xl/AVvXsEhnM8dC8bNlXURT73zk-lO3UNeeW_BN8gCnXwvozp_MlUqBHNQFJ1uOTv0R_crlYxpl_mzThiiW4DkGlqcyX2z4f5K2MZXBWhbTkJvOmWn5-Xz7ge0s2zBNN8hSvfZkO-cN4BaxXA/s400/i161718.png)
That's all! Now take a break and after that call your FreeDigits phone number from a cell phone (or any other phone). If you did the settings carefully you should hear the first voice prompt asking you to enter an access code. Using phone keyboard enter the 4 digits access code you setup. If the code was correct, you should now enter the destination number after the second voice prompt. Please keep in mind that the destination numbers should be prefixed with 01, 02 or 03 according to the dial plan you defined in Axon at step 1. The prefix automatically selects the desired VoIP provider.
I hope you enjoyed reading this article as much as I enjoyed spending the last night hacking Axon/IVM and writing this tutorial. Come back soon for the second part of the article which will show you how to integrate Skype in this solution.
Comments welcomed!
2 comments:
freedigits no me habre en colombia
freedigits no me habre en colombia
Post a Comment